FRAMING AND COMPOSITION OF CAMERA SHOTS

FRAMING AND COMPOSITION OF CAMERA SHOTS

Cubic Houses Rotterdam

We are going to do this project in groups of 5 people.

TASK I: GOOGLE DOCS
You are going to study most important concepts of photo framing: composition, angles and shots.
First thing you have to do is searching information to answer these questions:

  1. What’s the meaning of composing an image?
  2. Which aspects do we have to take into account when we compose an image?
  3. What do we mean by laws of composition? The rule of the horizon line, the rule of thirds and the rule of the gaze.
  4. What are compositional schemes?
  5. What do we mean when we talk about ‘shots’ in photography?
  6. How do we call the most typical shots?
  7. What do we want to express by using the different shots?
  8. What do we mean when we talk about ‘angles’ in photography, cinema or comic?
  9. How many types of different angles are there?
  10. What do we want to express by using the different angles?

All the answers must be shared through Google drive docs.

TASK II: SLIDES PRESENTATION

Once you have answered the previous questions, you have to look for images which will be used as examples of:
1. Different compositional schemes: at least six images that clearly represent one of the following: horizontal, vertical, oblique, circular, symmetrical and triangular composition.

2. Shot examples: at least eight images that clearly represent one of the following: Extreme wide shot, Very wide shot, wide shot, American shot, medium shot, medium close up, close up, extreme close up and cutaway/cut-in shot.

3. Angle examples:at least six images that clearly represent one of the following: neutral shot, high-angle shot, low-angle shot, worm’s-eye shot, bird’s-eye shot and Dutch angle.

You have to create a slide presentation and share it through Google drive.

TASK III: YOUR OWN SHOTS!

Now you have to take your own photographs to show what you have learnt:
1. Using the same motive sampling the different compositional schemes. 6 photographs.
2. The different shot types. 8 photographs.
3. The angles. 6 photographs.
You have to do at least 20 photographs, that you must share in a goolgle drive folder. Each of them must be named with the compositional scheme, shot or angle name that it represents and the number of your group and letter of your class.

Ex: group05-C-dutch-angle.jpg

This project is based in the webquest created by Juan Mercado.

ANGLES

UNIT 5: ANGLES

EXERCISE 01: ANGLES

1. TRANSLATION OF AN ANGLE

In Geometry, “Translation” simply means moving…without rotating, resizing or anything else,just moving.
If we want to draw an angle equal to a given one with vertex at a given point V.
TRANSLATION
STEPS:

  1. Center the compass at vertex of the given angle and draw an arc intersecting both sides of it. Without changing the radius of the compass, center it at point V and draw another arc
  2. Set the compass radius to the distance between the two intersection points of the first arc.
  3. Now center the compass at the point where the second arc intersects ray V.
  4. Mark the arc intersection point 1.
  5. Join point V with point 1 so you get the equal angle.

2. ANGLE BISECTOR


It is a line which divides the angle in two equal parts. Each point of an angle bisector is equidistant from the sides of the angle.
ANGLE-BISECTOR
STEPS:

  1. Draw an angle.
  2. Center the compass at vertex of the given angle and draw an arc intersecting both sides of it. We get 1 and 2
  3. Center the compass at point 1 and draw an arc.
  4. With the same measure center it at point 2 and draw another arc.
  5. Where these arcs cross we get point 3.
  6. If we join point 3 with the vertex of the angle we get the angle bisector.

3. TRISECTION OF AN ANGLE – DIVIDE A RIGHT ANGLE IN THREE EQUAL PARTS

Trisección
STEPS:

  1. Draw a right angle angle, to do this we use the steps of the perpendicular to a ray
  2. Center the compass at vertex of the right angle (V) and draw an arc intersecting both sides of it. We get 1 and 2.
  3. Without changing the radious of the compass center the compass at point 1 and draw an arc, so we get point 3.
  4. Without changing the radious of the compass center the compass at point 2 and draw an arc, so we get point 4.
  5. If we join points 3 and 4 with the vertex of the angle we get the three equal parts of the right angle.

4. 45º ANGLE

ANGLE-45
STEPS:

  1. Draw a right angle angle, to do this we use the steps of the perpendicular to a ray
  2. Draw the angle bisector of the right angle that you have drawn

5. ADDITION OF ANGLES

The addition of two angles is another angle whose measure is the addition of the measures of those two angles.
ADDITION-ANGLES
STEPS:

  1. Copy angle A using translation of an angle.
  2. From this new angle copy angle B.
  3. The solution is angle C.

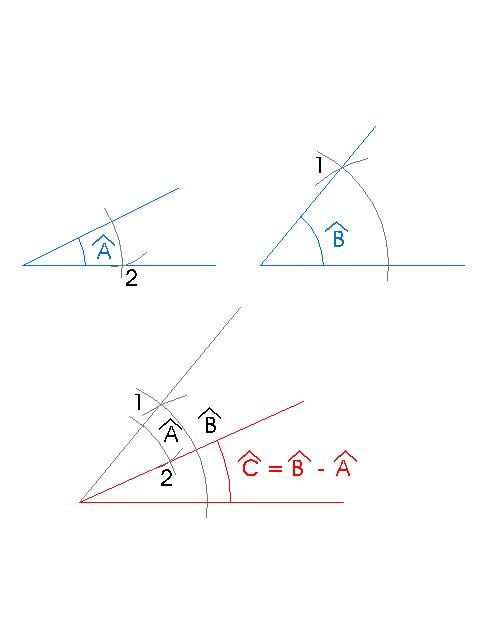
6. SUBTRACTION OF ANGLES

The subtraction of two angles is another angle whose measure is the subtraction of the measures of those two angles.
SUBTRACTION-ANGLES
STEPS:

  1. Copy angle B (the biggest one) using translation of an angle.
  2. From this new angle copy angle A.
  3. The solution is angle C.

SOLUTION OF DRAWING SHEET

Here you can see how to compose the complete drawing sheet, remember that you must underline the blue lines with your 0.4 technical pen, the red ones with 0.8 and the black ones with 0.2.
06

Here you can see one of our students’ drawing sheets:
ANGLES – DRAWING SHEET NUMBER 6 – EXAMPLE 2013

ANGLES

UNIT 05: ANGLES

ANGLES

In geometry, an angle is the figure formed by two rays, called the sides of the angle, sharing a common endpoint, called the vertex of the angle.
ANGLE

TYPES OF ANGLES

  • Angles equal to 90º are called a RIGHT ANGLES. Two lines that form a right angle are said to be perpendicular.
  • Angles equal to 180º are called STRAIGHT ANGLES.
  • Angles equal to 360º are called ROUND OR FULL ANGLES.
  • Angles smaller than a right angle (less than 90°) are called ACUTE ANGLES.
  • Angles larger than a right angle and smaller than a straight angle (between 90° and 180°) are called OBTUSE ANGLES.

TYPES-ANGLES

TRANSLATION OF AN ANGLE

In Geometry, “Translation” simply means moving…without rotating, resizing or anything else,just moving.

EXERCISE 05: TRIANGLES II

UNIT 04: TRIANGLES

EXERCISE 05: TRIANGLES II

1. ISOSCELES TRIANGLE

Draw an isosceles Triangle known one of its equal sides b = 4 cm. and one of its equal angles A = 30°.
ISOSCELES

2. ISOSCELES TRIANGLE

Draw an isosceles Triangle known the unequal side c = 5 cm. and the unequal angle C = 45°.
ISOSCELES-02

3. RIGHT TRIANGLE

Draw a right triangle known its legs b = 5 cm. and c = 4 cm.
RIGHT

4. SCALENE TRIANGLE

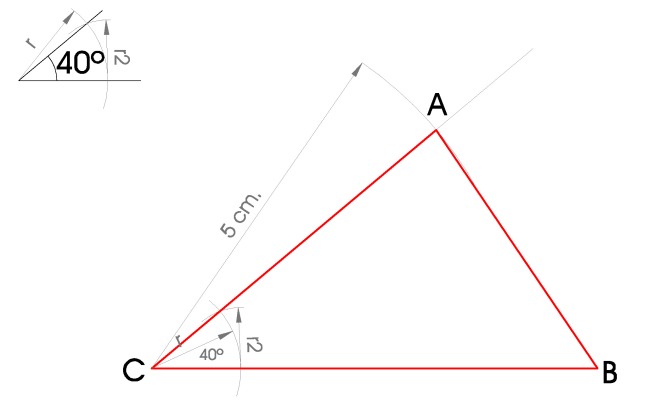
Draw an scalene triangle known side a = 6 cm., side b = 5 cm. and the angle between them C = 40°.
SCALENE

5. SCALENE TRIANGLE

Draw a triangle known its side a = 5 cm., its angle A = 60° and other of its angles C = 45°.
SCALENE-02

6. SCALENE TRIANGLES

Draw the triangles whose sides measure c = 5 cm. and b = 6 cm. and one of their angles is A = 45°.

SCALENE-03
Here you can download and print the photocopy that I gave you on Monday to continue practising the construction of triangles. Nex week I will share the solutions!
Here you can download the solutions.

EXERCISE 04: TRIANGLES

UNIT 04: TRIANGLES

EXERCISE 04: TRIANGLES

1. EQUILATERAL TRIANGLE (l = 5 cm.)


STEPS:

  1. Draw the given side and call its endpoints A and B.
  2. Center your compass in point A and open it to point B, draw an arc.
  3. Now center the compass in point B and with the same measure, draw another arc.
  4. Where these two arcs intersect each other, we will get point C.
  5. Join point A with point C and do the same with point B so you get the equilateral triangle ABC.

2. ISOSCELES TRIANGLE (a = b = 4.5 cm., c = 3.5 cm.)


STEPS:

  1. Draw the different side, in our case side c whose measure is 3.5 cm.
  2. Take the measure of the other two sides with your compass, in our case 4.5 cm.
  3. With this measure draw an arc centering your compass in point A.
  4. With the same measure draw another arc centering your compass in point B.
  5. Where these two arcs intersect each other, we will get point C.
  6. Join point A with point C and do the same with point B so you get the isosceles triangle ABC.

3. SCALENE TRIANGLE (a = 7 cm., b = 4.5 cm., c = 5.5 cm.)


STEPS:

  1. Draw a side, for example side a = 7 cm.
  2. Measure another side with your compass, for example b = 4.5 cm.
  3. With this measure, draw an arc centering your compass in point C.
  4. Measure the last side with your compass, c = 5.5 cm.
  5. With this measure draw an arc centering your compass in point B.
  6. Where these two arcs intersect each other, we will get point A.
  7. Join point A with point C and do the same with point B so you get the scalene triangle ABC.

4. TRIANGLES (a = 6 cm., b = 4 cm., B = 30º)

In this exercise we can get two possible solutions.

STEPS:

  1. Draw the given side a and call its endpoints B and C.
  2. Draw a 30º angle whose vertex is point B, to do this you have to follow the steps given to draw the trisection of an angle.
  3. Measure side b with your compass, in our case b = 4 cm.
  4. Center your compass in point C and draw an arc. Where this arc interects the side of the 30º angle we will get points A1 and A2.
  5. Bear in mind that in this exercise we can get two possible solutions A1BC and A2 BC.

5. RIGHT TRIANGLE (a = 6 (Hypotenuse), b = 3 cm.)


STEPS:
As we have to draw a right triangle we have to remember that this triangle has a 90º angle and that this angle faces the hypotenuse.

  1. Draw the given side b (3 cm.) and call its endpoints A and C.
  2. Draw a 90º angle whose vertex is point A, to do this you will need to follow the steps given to draw the perpendicular to a ray.
  3. Measure the hypotenuse with your compass, in our case 6 cm.
  4. Center your compass in point C, and where this arc intersects the right angle we will get point B, the last vertex of our triangle.

6. TRIANGLE (a = 6.5 cm., B = 30º, C = 105º)


STEPS:

  1. Draw the given side a and call its endpoints B and C.
  2. Draw a 30º angle whose vertex is point B, to do this you have to follow the steps given to draw the trisection of an angle.
  3. Draw a 105º angle whose vertex is point C, to do this you have to follow the steps given to draw a 105º angle.
  4. Where these two lines intersect you will get vertex A.

Here you can see the solution of the complete drawing sheet:

EXERCISE 03: ANGLES

UNIT 3: ANGLES

EXERCISE 03: ANGLES

1. TRANSLATION OF AN ANGLE

In Geometry, “Translation” simply means moving…without rotating, resizing or anything else, just moving.
If we want to draw an angle equal to a given one with vertex at a given point V:
TRANSLATION

STEPS:

  1. Center the compass at vertex of the given angle and draw an arc intersecting both sides of it. Without changing the radius of the compass, center it at point V and draw another arc.
  2. Set the compass radius to the distance between the two intersection points of the first arc.
  3. Now center the compass at the point where the second arc intersects ray V.
  4. Mark the arc intersection point 1.
  5. Join point V with point 1 so you get the equal angle.

2. ANGLE BISECTOR


It is the locus of the points in the plane equidistant from the sides of an angle. Therefore it is the locus of all the circle centres that are tangent to the sides of the angle.
It is a line which divides the angle in two equal parts.

STEPS:
First of all, we need to draw an angle and call its vertex O and its sides r.

  1. Center the compass at vertex of the given angle and draw an arc intersecting both sides of it. We get 1 and 2.
  2. Center the compass at point 1 and draw an arc.
  3. With the same measure center it at point 2 and draw another arc.
  4. Where these arcs cross we get point 3.
  5. If we join point 3 with the vertex of the angle (O) we get the angle bisector.

3. ANGLE BISECTOR WHEN THE VERTEX OF THE ANGLE IS OUTSIDE THE PAPER

If we have two lines, r and s, that intersect in a point but that point is outside the paper and we want to get their angle bisector, we have to follow this steps.

STEPS:
First of all we need to draw to lines r and s that intersect in a point outside our paper.

  1. Draw a line, t, that intersects with both lines r and s, forming angles A, B, C and D.
  2. Get the bisector of angles A, B, C and D.
  3. Where the line bisectors intersect, we will get points M and N.
  4. If we join points M and N you will get the angle bisector of the angle which sides are r and s.

4. TRISECTION OF AN ANGLE – DIVIDE A RIGHT ANGLE IN THREE EQUAL PARTS

The only trisection of an angle that is possible to do by a ruler and compass is the trisection of a 90º angle.

STEPS:

  1. Draw a right angle, to do this we use the steps of the perpendicular to a ray.
  2. Center the compass at vertex of the right angle (V) and draw an arc intersecting both sides of it. We get 1 and 2.
  3. Without changing the radious of the compass, center the compass at point 1 and draw an arc, so we get point 3.
  4. Without changing the radious of the compass, center the compass at point 2 and draw an arc, so we get point 4.
  5. If we join points 3 and 4 with the vertex of the angle we get the three equal parts of the right angle.

5. 75º ANGLE


STEPS:

  1. Draw a perpendicular line to ray r on point V; to do this, you will need to follow the same steps given to draw the perpendicular to a ray.
  2. Center the compass at vertex of the right angle (V) and draw an arc intersecting both sides of it. We will get 1 and 2.
  3. Without changing the radious of the compass, center the compass at point 1 and draw an arc, so we will get point 3.
  4. Join point 3 to the vertex of the angle V getting a new angle.
  5. Draw the line bisector of the new angle, so we will get point 4.
  6. If we join point 4 to the vertex of the angle V, we will get a 75º angle whose vertex is point V.

6. 105º ANGLE


STEPS:
First of all, you need to lengthen ray r to the left.

  1. Draw a perpendicular line to line r on point V; to do this, you will need to follow the same steps given to draw the perpendicular to a ray.
  2. Center the compass at vertex of the right angle (V) and draw an arc intersecting both sides of it. We will get 1 and 2.
  3. Without changing the radious of the compass, center the compass at point 1 and draw an arc, so we will get point 3.
  4. Join point 3 to the vertex of the angle V getting a new angle.
  5. Draw the line bisector of the new angle, so we will get point 4.
  6. If we join point 4 to the vertex of the angle V, we will get a 105º angle whose vertex is point V.

ANGLES

UNIT 03: ANGLES

Definition of an angle:

In geometry, an angle is the figure formed by two rays, called the sides of the angle, sharing a common endpoint, called the vertex of the angle.
ANGLE

Types of angles:

  • Angles equal to 90º are called a RIGHT ANGLES. Two lines that form a right angle are said to be perpendicular.
  • Angles equal to 180º are called STRAIGHT ANGLES.
  • Angles equal to 360º are called ROUND OR FULL ANGLES.
  • Angles smaller than a right angle (less than 90°) are called ACUTE ANGLES.
  • Angles larger than a right angle and smaller than a straight angle (between 90° and 180°) are called OBTUSE ANGLES.

TYPES-ANGLES

Translation:

In Geometry, “Translation” simply means moving…without rotating, resizing or anything else, just moving.

ANGLES

ANGLES

In geometry, an angle is the figure formed by two rays, called the sides of the angle, sharing a common endpoint, called the vertex of the angle.
ANGLE

TYPES OF ANGLES

  • Angles equal to 90º are called a RIGHT ANGLES. Two lines that form a right angle are said to be perpendicular.
  • Angles equal to 180º are called STRAIGHT ANGLES.
  • Angles equal to 360º are called ROUND OR FULL ANGLES.
  • Angles smaller than a right angle (less than 90°) are called ACUTE ANGLES.
  • Angles larger than a right angle and smaller than a straight angle (between 90° and 180°) are called OBTUSE ANGLES.

TYPES-ANGLES

1. TRANSLATION OF AN ANGLE

In Geometry, “Translation” simply means moving…without rotating, resizing or anything else,just moving.
If we want to draw an angle equal to a given one with vertex at a given point V.
TRANSLATION
STEPS:

  1. Center the compass at vertex of the given angle and draw an arc intersecting both sides of it. Without changing the radius of the compass, center it at point V and draw another arc
  2. Set the compass radius to the distance between the two intersection points of the first arc.
  3. Now center the compass at the point where the second arc intersects ray V.
  4. Mark the arc intersection point 1.
  5. Join point V with point 1 so you get the equal angle.

2. ANGLE BISECTOR


It is a line which divides the angle in two equal parts. Each point of an angle bisector is equidistant from the sides of the angle.
ANGLE-BISECTOR
STEPS:

  1. Draw an angle.
  2. Center the compass at vertex of the given angle and draw an arc intersecting both sides of it. We get 1 and 2
  3. Center the compass at point 1 and draw an arc.
  4. With the same measure center it at point 2 and draw another arc.
  5. Where these arcs cross we get point 3.
  6. If we join point 3 with the vertex of the angle we get the angle bisector.

3. TRISECTION OF AN ANGLE – DIVIDE A RIGHT ANGLE IN THREE EQUAL PARTS

Trisección
STEPS:

  1. Draw a right angle angle, to do this we use the steps of the perpendicular to a ray
  2. Center the compass at vertex of the right angle (V) and draw an arc intersecting both sides of it. We get 1 and 2.
  3. Without changing the radious of the compass center the compass at point 1 and draw an arc, so we get point 3.
  4. Without changing the radious of the compass center the compass at point 2 and draw an arc, so we get point 4.
  5. If we join points 3 and 4 with the vertex of the angle we get the three equal parts of the right angle.

4. 45º ANGLE

ANGLE-45
STEPS:

  1. Draw a right angle angle, to do this we use the steps of the perpendicular to a ray
  2. Draw the angle bisector of the right angle that you have drawn

5. ADDITION OF ANGLES

The addition of two angles is another angle whose measure is the addition of the measures of those two angles.
ADDITION-ANGLES
STEPS:

  1. Copy angle A using translation of an angle.
  2. From this new angle copy angle B.
  3. The solution is angle C.

6. SUBTRACTION OF ANGLES

The subtraction of two angles is another angle whose measure is the subtraction of the measures of those two angles.
SUBTRACTION-ANGLES
STEPS:

  1. Copy angle B (the biggest one) using translation of an angle.
  2. From this new angle copy angle A.
  3. The solution is angle C.

SOLUTION OF DRAWING SHEET

Here you can see how to compose the complete drawing sheet, remember that you must underline the blue lines with your 0.4 technical pen, the red ones with 0.8 and the black ones with 0.2.
06

Here you can see one of our students’ drawing sheets:
ANGLES – DRAWING SHEET NUMBER 6 – EXAMPLE 2013